Key Takeaways:
- Cutter compensation allows for precise adjustments in CNC machining, ensuring accuracy and quality in the manufacturing process.
- It enables operators to account for tool wear, diameter variations, and other factors that affect the final dimensions of the part.
- Understanding and correctly implementing cutter compensation can reduce errors and improve the efficiency of CNC operations.
CNC machining is a big business. It’s estimated that as of 2020, CNC machining is an $81.95 billion industry and is expected to reach $128.4 billion by 2028.
This growth is being driven by greater demand for precision parts, a result of increases in technology, and customization. Not to mention the sustainability requirements and exacting standards of industries such as aerospace, medical, and military.
The convergence of technology and customer demand for higher tolerance means that precision manufacturers must fully utilize every tool at their disposal to meet expectations. From selecting the right material strength characteristics, the right machine, to the right tooling quality, companies are under the gun to achieve greater precision in all parts.
And one such method is the use of cutter compensation.
What is Cutter Compensation?
Cutter compensation (cutter comp), or Cutter Diameter Compensation (CDC), allows programmed path adjustments on the CNC machine to impart greater precision and compensate for the machine, tool, or material characteristics.
By shifting the centerline from the tool shaft to the cutter's edge, the program can use geometry to determine the offset direction instead of the tool's center point on the shaft.
One advantage of this process is that the same program can be used for tools with different diameters. It also has the advantage of allowing compensation for issues such as the size of the tool, tool wear, and can compensate for tool deflection. This makes cutter compensation essential for quality, precision, and versatility.
Cutter compensation also acts as an additional guard for precision. Many CAD programs will automatically calculate the toolpaths for complex parts. While this is done accurately with CAD software, it doesn’t allow the operator to use a different tool to save time in tool changes. It also may not allow for compensation of tool wear to ensure the part is cut accurately, even with a slightly worn tool.
Cutter compensation uses cutter comp G code to define the actual offset to be performed. This may be cutter diameter compensation or cutter radius compensation, depending on the cut and the tool size. The centerline is always set based on the tool's radius - any less, and the piece would be undercut.
But in complex part geometries or contours, the tool shape and programming may not cut with the required precision. This is where cutter compensation comes in. If the cut is equal to or less than the tool's radius, the tool radius is used as the offset. If the size of the tool and the cut required is greater than the radius, the tool diameter offset can utilize the center line to determine the best path.
Monitor Machine Tools in Real-Time
When Should You Use Cutter Compensation?
CNC machines run G code to determine the tool path for the piece work. But often, slight adjustments need to be made to account for deflection or tool wear. Cutter compensation allows minor adjustments without changing tools or rewriting G code.
By manually adding the tool diameter into the machine control, the tool position can be recalibrated. There is often no need to change tools or rearrange them in the carriage.
Parts with extensive contours or complex geometries are often candidates for cutter comp. An example can be found in the discussion of the tooltip. Because the coordinates of the tooltip center often determine setting coordinates, the program may not reflect the actual coordinates of the cutting edge. If the part dimension affects the cut at the tip, cutter compensation may be used.
How to Use Cutter Compensation
Cutter compensation can be used by manually programmed CNC machines effectively, and it’s a great way to achieve part accuracy without excessive change of tools and other adjustments. However, automated CNC machines use cutter comp for precision as well. By using G codes, cutter compensation can reduce production time, correct mistakes, and require less manual milling.
CNC machines will read G code instructions to determine where to position the cutting tool relative to the piece and based on the tool's diameter from which it obtains the radius. This way, operators can enter the tool diameter rather than manually calculate the cutter radius compensation from the offset table, reducing human error and saving time.
Here are some of the adjustment codes:
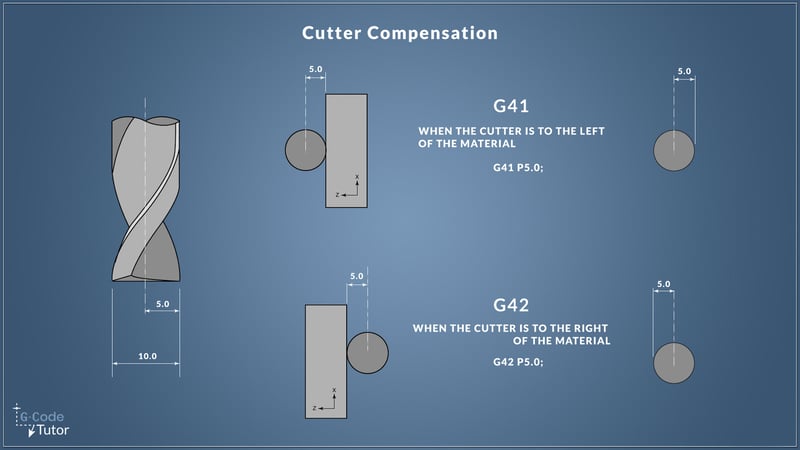
- The G41 code will allow left compensation to the left of the tool path.
- G42 code will enable the right compensation to the right of the tool path.
- If the G codes have a D number code associated with it that follows the G code, the offset will use the diameter. The D number tells the machine which tool to use, and the CNC machine control calculates the offset using the tool's diameter.
 Source
If there is no code, the programming will use the tool's radius. This distinction makes it possible to use a larger tool for cutting that is required because the cutter radius compensation, and therefore offset, can be determined mathematically by the CNC machine.
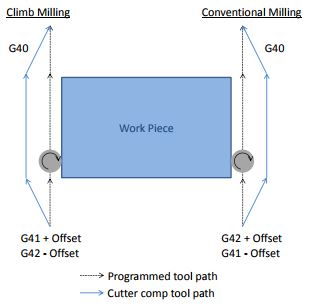
Climb Milling
The tool compensation required may depend on whether the machine uses climb milling or traditional milling. In climb milling, the cutting is in the same direction as the stock feed, and the tooltip strikes the workpiece at the cut's top. This method requires less recutting because chips fall behind the cutter. It’s also more efficient in power consumption, and tools last as much as 50% longer.
Climb milling is often used in automated CNC machines. While backlash is always a consideration, pieces can be worked easier. This process produces a better surface finish and requires less compensation.
Conventional Milling
Most modern CNC milling machines use climb milling. But conventional milling may be required if the workpiece requires work hardening as the method generates heat. It also causes more tool wear, and the cutter catches much of the cut chips and recuts them as the work is being done.
Manual CNC machines that use conventional milling can be programmed with cutter compensation using an offset table to address many issues. The operator selects the value from the tool table and enters it. This helps reduce the manual aspect of changing tooling or continuous repassing for finishing the part to specification.
 Source: MachMotion
Various Methods of Using Cutter Comp
The type and purpose of the cutter compensation depend on the direction of the action required. Most CNC machines will allow compensation in two axes, the X/Y or X/Z axes.
The cutting tool radius must be perpendicular to the cut area. Cutter compensation can also be used to account for the difference between a programmed tool path and the actual tool path relative to the tool's diameter. In this case, the compensation will follow the same tool path.
For example, suppose the tool used is a re-sharpened cutter with a 0.10mm diameter removed during sharpening. In that case, the compensation would retrace the tool path using the actual radius and a positive offset to compensate and remove the additional 0.10 mm.
Cutter compensation is also used to account for a tool with a larger diameter. The CNC machine will read the actual tool diameter and adjust with a negative value to allow the larger diameter tool to make the same cut using a diameter offset.
Automation and Monitoring Makes Cutter Compensation Easier
Cutter compensation is used by automated CNC-driven machines and manually programmed machines alike. However, consider the factors involved. The machine must be programmed with the G41 or G42 code to perform the ramp-on and ramp-off movements required in the compensation. Alternately, the G40 "Off" command must follow so the compensation doesn’t occur where it isn’t needed.
While cutter compensation is a powerful tool to ensure precision parts, it’s still open to human error when done manually. For example, an operator may program compensation using P codes to tell the tool radius manually.
But this requires knowing the radius of the tool, knowing that it’s in pristine condition, and understanding the programming requirements. Using a G41 or G42 code, CNC machines can be programmed to automatically apply cutter compensation based on the variables' measurement. This saves time and labor and reduces the chance of human error in manual calculations using the tool table. By automating cutter compensation, machines can complete work more precisely.
Plug-and-play Machine Connectivity
Getting the Most Out of Your Tooling
Leveraging a tool monitoring solution can help precision manufacturers better understand and exploit the full life of their tools, prevent downtime from catastrophic failure and excessive tool changeover, and significantlly reduce scrap parts due to worn tools.
BC Machining, a manufacturer of fabricated metal parts, was producing such large quantities of scrap that they were forced to run their machines at 200% capacity just to hit their production goals. With no insight into when tools were worn or about to break, BC Machining accumulated significant costs from producing scrap and replacing broken tooling.
To prevent scrap production and maximize tool life, they partnered with MachineMetrics. Read our case study to learn how BC Machining virtually eradicated scrap from tool wear, significantly reduced their changeover times, and saved $72k per machine annually.
Read the complete case study.

.png?width=1960&height=1300&name=01_comp_Downtime-%26-Quality_laptop%20(1).png)



.gif)





Comments